
|
The world of non-commercial film and A-V |
Events Diary | Search | ||
| The Film and Video Institute | | ||||
The Videomaker's Journey: part twelve |
Which is useful in the making of dramas and special movies. Note that most of this is in the "further advice" range and not for beginners. Advice for beginners is specially noted.
CONTENT
- A Note for Beginners.
- How to Record Good Quality Audio.
- Handling a Microphone Boom.
- Recording Levels.
- Editing the audio.
- Hiss, Hum and Distortion
- The Quality of Audio
- Impedance Levels of Line and Microphone.
- Microphone Types.
- Audio Meters
- A Zero db Audio Level Signal
- Recording a Commentary
- The microphone in a video camera - when operated in a domestic room - will mainly pickup up the sound that is directly ahead and also to each side of the area that is ahead. You will pick up low volume audio around to about 45 degrees behind the video camera - it depends on the type of microphone.
- When outdoors - all the background noise is picked up. If there is an audio volume control on the video camera that will adjust the recorded volume, and there are trees in the area - increase the recording volume and you will hear a multitude of bird noises and loud traffic noise. If there is strong wind - it will drown out all other sound as the wind brushes over the surface of the microphone.
- If there is no volume control for the recorded audio - the headphone volume can be adjusted so that you can hear the distant noise in the headphones.
- If you are in a very noisy environment - such as at a school - get the video camera up close to the speaker, about 600mm away from the mouth and you will then get clear dialogue as the background noise will be much subdued.
- If you are in a concert hall or at a school function, try to get close to a loudspeaker when you set up to take the video shots. Rely on your own microphone system, a home movie maker who tries to join a hard wire into a public address system, makes a recipe for disaster. Very experienced video makers can run into a lot of strife when they try it.
How to Record Good Quality Audio.
Read Part 3 (Additional Equipment). The following
is a reminder of the essential points:-
- use a microphone on a boom - how to handle it is described below.
- get the microphone close to the actors - this reduces background noise.
-
the actors must project their voices - they must speak loudly.
Now if you did this with the old Hi8 or Video 8 cameras you would get audio with bad distortion, but there seems to be no distortion with the digital recording on digital video cameras. - use good quality headphones - turn the volume of the headphones up to 50% of maximum volume - but reduce this setting, if unexpected loud noises are likely to cause ear damage. You must be able to hear the words distinctly above the background noise - if possible, reduce or eliminate the background noise. Listen, to make sure noise is not introduced by rough handling of the microphone boom and cables.
- take care not to tug on the cables or the connections - they are easily damaged.
- do not shake the microphone, or the boom and cables - the microphone or the boom should not touch anything.
- use a wind muff in windy weather when outdoors. Refer to Part 3 - how to make a wind muff.
- All noise in front of the microphone, including distant noises, will be picked up - hence the need to aim the microphone up or down so as to avoid reflected noise and distant noise.
- If there is open sky above, holding the microphone below the waist and pointing it up is the best setup. If the actors are standing on grass, soil or carpet, then the microphone can be held above the head and pointed down.
- If the microphone is pointed at hard, sound reflecting surfaces, then unwanted noise may be heard.
- Normally the boom operator should wear the headphones - but if they are inexperienced - check that they properly listen for problems. When I am the camera operator, I am able to wear the headphones - which I prefer - and do the job properly.
Refer to Part 17 (Theory and Practice of Editing).
We find that a microphone on a boom generally records dialogue at about +3 to +5 db. This is good, for when this is reduced to about 0 db during editing a noisy background is brought down to a very acceptable level.
When editing - the dialogue should be peaking at no more than +2 db to +3 db with the average level at zero or just below zero. Occasional spikes to +4 db or +5 db are OK.
- Hiss sounds like tree leaves rustling in the wind. It is usually caused by random signals generated by microphones, and other electrical equipment. Stereo cables should be taped together in pairs, use the ones supplied with your video equipment if they are already fixed in pairs. If you are using separate 75 ohm cables, then tape them together in pairs.
- Hum is an unwanted low-pitched noise heard in the background of the audio signal.
-
Distortion is an unwanted alteration to the sound, causing soft tones
to become hard or harsh, and high tones to become shrill. Distortion used
to be caused by recording or replaying at too high a level and also by using
poor quality recording equipment. Digital video cameras and computer editing
equipment have considerably reduced this problem.
If good quality sound is played at very high levels, there seems to be no distortion as described above, but the sound may lose its soft tone. Digitally recorded sound does not appear to distort at high levels - try winding up broadcast TV audio on your TV set. I found that children's and women's soft tones did not change on most of the programs that I checked.
I find it is easy to get good quality audio now that I have a digital video camera - and provided I use a microphone on a boom - use computer editing - and have the actors project their voice. It is essential to listen for problems in the headphones with the headphone volume turned up. By good quality audio - I mean audio where the words are distinctly heard -and without unwanted background noise.
The standard test is to wind up the volume of your audio - either in the headphones or in your computer editing equipment. The audio might sound OK at the normal volume at home, but when it is replayed at a high volume in a hall - we sometimes hear the remark: "But it sounded OK at home."
Impedance of Line Level Audio and Microphone Level Audio.
First a warning - audio signals from tape recorder, VCR, TV etc., output sockets are very high when compared to signals from a microphone, which has a very low signal. So, if you accidentally feed "line level audio" into a microphone socket - you will blow something up - either your own ears, or your video camera or other equipment.
-
"line level audio" (music and audio) is high impedance - it is the audio
that is input into and output from video making equipment such as - video
cameras, VCRs, TVs, DVD recorders, DVD players, cassette players etc. It
is measured in many thousands of ohms.
Don't use cables longer than 2 to 3 metres - as this may degrade the audio.
Look at the white and red connections i.e., the left and right stereo connections - these are RCA-line level connections. - "microphone level audio" may be high or low impedance - use low impedance microphones, which are usually 600 ohms and you can use up to 80 metres of cable with little or no degradation. Video cameras automatically convert microphone input into line level audio. Headphones are of low impedance - only plug them into headphone sockets. If you are messing about with cable adapters - don't connect to line level audio - you will blow your ears up.
- audio mixers automatically adjust the impedance from high to low and back to high impedance - depending on how you connect the cables to the various in and out terminals. If you are not sure about how to connect the cables - the rule is -turn all the volumes down to zero - switch the power on - then slowly turn the volumes up as you listen. A friend of mine, who is an expert in these matters - and myself - use this rule when trying out new equipment and new ideas.
-
On my audio mixer - the microphone, input and output is 600 ohm. The line
level input is 50,000 ohm maximum - and the line level output is 5000 ohm
maximum.
Refer to Part 17 (Theory and Practice of Editing) where you will learn how to handle the different strengths of audio.
We only need to use two microphones - the one in the digital video camera - and the one on the boom. These are electret condenser microphones. Electret condenser microphones do not tolerate cables longer than 20 metres. I also comment on some other types that your friends might use.
The dynamic microphone is used on rare occasions by some home movie
makers. I have used one 3 times in 15 years. I made a documentary about the
adjacent state primary school. The children spoke in German - this was sent
to a school in Germany - it is used by the local school principal, who shows
it to visiting parents. I also used it to make a documentary of a 25 mile
long bicycle club time trial - the team were competing against a bicycle
club in the UK. It was also used as a prop in a movie.
It is ideal for recording commentaries or voice-overs, single person speakers
and for interviewing people. This microphone will eliminate background noise
in most cases and substantially reduce the background noise in extreme
situations. When indoors it eliminates noise from motor vehicles roaring
up the street and aeroplanes flying overhead. It works very well in the back
seat of a very noisy car.
This microphone must be held about 7 to 10 centimetres from the mouth as
well as slightly below the mouth. Holding it too close, records unwanted
breathing noises.
It is useful to have a little knowledge about how microphones work.
(a) the condenser microphone and the electret condenser microphone
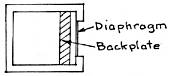 |
All condenser microphones have a thin plate (the diaphragm) and an adjacent thicker back- plate. Both plates are electrically charged so as to form the two plates of a capacitor. The sound waves vibrate the diaphragm; this varies the space and thus generates an electrical signal. This signal is weak and has to be amplified by an electrical circuit. |
Fig, 1. Condenser microphones. |
|
The difference between the two types of condenser microphones is as
follows:
- the condenser microphone has a thin metal diaphragm plate and a thick metal back-plate. The metal plates are charged by a battery or external phantom power supply. This power supply also charges the amplifier circuit. The phantom power supply is supplied by the video camera on the same two conductors that sends the audio signal. Look at the microphone input connector on your video camera, if it is labelled "mic (plug in power)" - this supplies the phantom power. Note that other microphones that don't need phantom power can also be plugged into these input connectors.
- the electret condenser microphone is the same as the condenser microphone described above, except that the diaphragm is a thin sheet of plastic, impregnated with electret material, and the back-plate is made of ceramic, which is coated with electret material. This microphone will have a battery to supply the power - the phantom power is not used. This microphone can be connected to the video camera even though it has a phantom power supply for the other type of microphone.
- both types of microphones provide good clear sound for music and vocals.
(b) the dynamic moving coil microphone
This type is usually referred to as a dynamic microphone. I own one - but there is no need to buy one, unless you are going to use it a lot - borrow one if you can - it is used for interviews. The dynamic microphone has a very fine coil of wire attached to the diaphragm . The end is suspended in a magnetic field. When sound waves vibrate the diaphragm, the coil vibrates in the magnetic field - this generates an electrical signal.
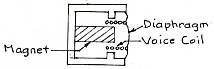 |
The dynamic microphone works without any power supply, it is very rugged and very reliable in extreme weather conditions. While it will tolerate rough handling and exposure to extreme temperature and humidity - do not shake it or rub your fingers along it, when using it, as this will generate static. It can handle very loud audio without overloading. |
Fig. 2. The dynamic moving coil microphone.
(c) the ribbon microphone
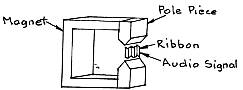 |
This is also a dynamic microphone - it is usually referred to as a ribbon microphone. It softens the tone of brass instruments. Refer fig. 3. This type is not recommended for domestic use as they are fragile. |
Fig. 3. The ribbon microphone.
(d) the lavalier (or tie clip) microphone
This is a miniature unit; it is usually of the electret condenser type - when it is connected to the video camera by a cable, the subject must be static. Do not place it behind a tie or more than one layer of cloth. Use double sided sticky tape to attach it to the cloth - otherwise, noise will be created as it rubs against the cloth.
(e) the boundary microphone
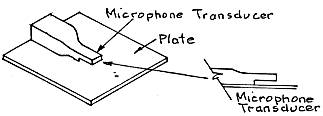 |
While I have seen one of these used - the following information was extracted from various books and club lectures. Refer fig. 4. This microphone is laid on or attached to piano lids, tables, desks, lecterns, walls and panels. Direct and reflected sounds combine in phase, as they are close together. When fixed to a panel, it is directional, if the panel is aimed at a target. The audio will be picked up by both sides of the panel, so in some situations, you will need to cover the unwanted side with two layers of carpet. For best results, the surface should be at least one square metre. If the microphone is attached to a clear plastic panel, it can be hung on a wall. Boundary microphones are also available with an additional uni-directional polar pattern on top - look for a microphone opening on top. |
Fig. 4. The boundary microphone.
VU Meter (swing meter)
One vu = 1 db when listening to a steady tone. Zero db is the optimum level for dialogue, the peaks in the dialogue should be no more than + 2 vu or + 3 vu. Plus values are above the zero reading (into the red or in the overload zone) - and minus values are below the zero reading.
The VU meter responds slowly to percussion sounds, which have high rapid peaks; and will therefore read less than the true level of the peaks. Therefore, in this situation, record at - 6vu to - 8vu so as to prevent distortion. Other instruments with a low peak-to-average ratio can be recorded to around + 3 vu without audible distortion. I find the vu meter is difficult to read when setting the audio levels - but it is better to use it than trying to set the levels by ear.
The LED Meter (bar graph)
The LED bar graph audio level indicators on VCRs, read in decibels (db). These indicators respond quickly to peak levels and are an accurate indicator of recording levels. Zero db corresponds with zero db on a vu meter, which is the normal operating level of a VCR in a lounge room.
It is very easy to set the audio levels - using this audio meter. I play the audio from the Casablanca Avio and my iMac computer through a VCR audio level meter when editing my movies. I have made a "DVD audio calibrator" which can be viewed below on the Quicktime video clip - it has a zero db audio signal - this is used to calibrate all my equipment. How to do all this will be shown in "the theory and practice of editing".
| Sony sell a CD with a zero db tone and a minus 10 db tone. This was used
to calibrate my DVD audio calibrator.
The video clip here is a copy of my DVD audio calibrator - you should be able to make your own copy from it. It has dialogue and music set to approximately zero db - and a steady tone at zero db. This can be used to edit the audio volume approximately by ear, if you install it temporarily on the movie timeline in the computer- or you can use the steady tone to calibrate your equipment and edit the audio levels accurately - as shown in "the theory and practice of editing". |
I use a digital video camera aimed at and held about 400mm from the speaker's mouth. I glue the commentary sheets to cardboard, so that the paper doesn't rustle as it is picked up. I bend up one corner of each cardboard sheet so that they are easy to pick up.
The speaker must project their voice and modulate the volume in an appropriate manner - try to find a school teacher or an actor with a good voice.
< Part 11 | Introduction | Part 13 >
© copyright Arthur Bullock, 2007
Share your passions.
Share your stories.