
|
The world of non-commercial film and A-V |
Events Diary | Search | ||
| The Film and Video Institute | | ||||
The making of 225 by Christopher David
Introduction: The Gears | From Ideas to Footages | Post-production: Tricks revealed |
The Idea
Having been introduced to all this software in a short space of time I messed about, playing with little clips and images, but desperately needed a proper project. During a trip to London with my family, the idea came in a split second when Roo became bored with his colouring book (most people get bored near Peterborough). The idea isn’t arty, or even clever and original, but it seemed to fulfil most requirements. Moreover it would only be short (my original aim was for it to be 225 – not 300 - seconds long) and it wouldn’t rely on dialogue, making it popular with competition judges and foreign audiences. Nevertheless, it was about to take up 12 months of my life!
Pre-production
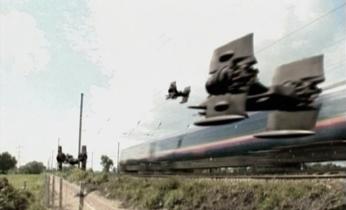
The film combines live action with CGI (computer generated images). The computer bit is (fairly) easy, but shooting the real stuff and then to merge it in post-production was to prove tricky.
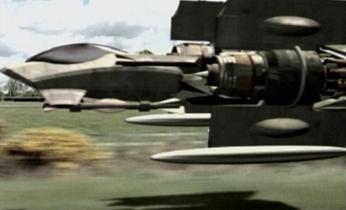
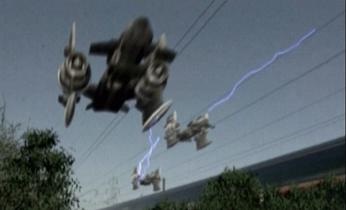
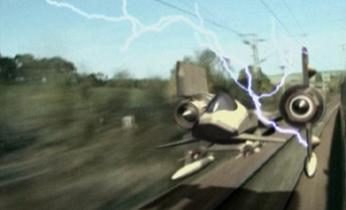
The first job was to design a craft. It was important not to use a readily available “Star Wars” X-wing fighter (copyright and legal reasons). I already had the idea for some variable swing-wing geometry to allow the craft to pass under a bridge. Now, nearly two years on, I think the craft could have been better, but nevertheless it still took about two months to model, add textures, colours, materials and ‘maps’ (paintings or drawings effectively ‘stuck’ on the model to create panels, stains, rust etc).
Ideas were developed, and little scenarios started to form in my mind. These were quickly jotted down into short, sometimes half a page shot lists. These were word pictures, instead of a conventional storyboard. If I had been working with a large crew I think pictures would have been essential; but these were simply, for me, an “aide-memoir”.
Words also allow for some flexibility on location. With a storyboard we all tend to spend so much time concentrating on making it look like the little drawing that we tend to miss the obvious, and sometimes beautiful, solutions staring into our viewfinder!
It was, however, important to remember practical limitations. ‘Proper’ filming on a train is only allowed under certain circumstances. Trackside access is not allowed at all! I found a couple of spots north of York where I could get a camera fairly close to the track without trespassing.
A fundamental element of the film was speed. I wanted some shots of a train hurtling along at 150mph, with the camera “crabbing” (tracking sideways) alongside. I studied maps, and drove all over Yorkshire looking for a suitable stretch of road adjacent to a railway track. Finally, after no success, I realised the solution lay in the computer.
Shooting
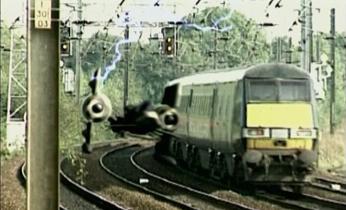
Despite appearances, very little was shot on a train. (Clever viewers will
also spot the train interior is not even a 225 train). We used a small, discrete
handycam for the 6 shots on a train, boarding at York, getting off at the
next station and then returning. Sunday lunchtime was quietist.
Most of the train interiors were shot in my bedroom, where we had control
over lights, sound and camera movements.
Not surprisingly, there were interminable retakes shooting a child looking at non-existent spacecraft, through a non-existent window from a non-existent train. Tempers were often frayed. There was much shouting and tears -me mainly. Roo (7 at the time) did well and persevered.
The trackside shots exploited the idea that trains are basically the same at the front and back. Therefore it’s possible to use one shot four times (normal, played backwards, mirror flipped, and mirror flipped / played backwards). These shots could be varied by adding trees, signals, bridges and tunnels later.
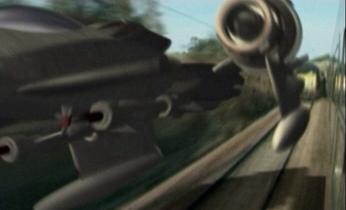
It was often difficult to frame a shot for an object that didn’t yet exist. Composition in the original camera shot would often have to be ‘clumsy’ so that once the object (usually a flying spacecraft) was added, the results would appear natural – as if the cameraman was shooting an object that was actually there. It sounds obvious, but is quite tricky to achieve, as I’m sure we all instinctively want to frame a shot ‘correctly’.
‘Backgrounds’ were shot from a car window as my wife drove us along a dual carriageway. Stretches of flat, uninterrupted road were chosen to match the other ‘real’ film locations. Once again, these could be flipped or reversed to fulfil a variety of applications.
My background is 16mm film, and I always yearn for the film ‘look’. I shoot with a variable shutter usually set to 50th second (film exposure speed at 25fps). The problem usually involves the conflict between wanting ‘blurry’ but realistic shots, which look arty but which consequently are very difficult to align with the CGIs.
I also shot dozens of pics of locomotives, carriages, train details etc. These were to be the basis of much of the modelling maps for the CGI trains. These were shot with a high definition digital still camera, and imported into Photoshop for manipulation. (Maps are photographs or patterns which are applied to a digital model – a bit like wallpapering –and help to create an authentic look).
Whenever shooting, it was always important to make notes of the perspective, height of the camera and the position of the vanishing point. A laser tape was used to measure distances to the track. All this information is essential when aligning the CGI model with real life. I found that accuracy within 0.1degree was necessary(!) otherwise it started to look wrong.
It was also important to check for continuity of direction (both inside and outside the train). Remember, we could always spin and flip the train during the edit. We do ‘cross-the-line’ occasionally, but there are always editing tricks to make it less noticeable. More critical was continuity of weather, sunshine, sky, etc.
Roo wore a trendy khaki shirt over a white tee shirt (and we bought several identical sets in case any were damaged). Khaki proved very similar to the green screen, so colour separation was very tricky. In retrospect I should have shot with a blue screen (but I didn’t have one) or used a different shirt (but we’d already begun shooting before the problem became apparent).
Introduction: The Gears | From Ideas to Footages | Post-production: Tricks revealed
Share your passions.
Share your stories.